Will AI Replace Your Software Testing Job?


Today, we’re tackling a big question: With the rise of code generators and AI that can make UI elements based on a single drawing, will AI take your software testing job?

The short answer is no. Today we can safely tell you that no, AI won’t take your job. Instead, we think it will enhance the way you work. Let’s see how we can make AI a powerful ally for software testers.

Role of AI in Software Testing

We like to think of AI in the testing world’s context as a controlled chaos maker. We can simulate some parts of being human to introduce some unpredictability in our tests and see if our app mitigates against the chaos.

Instead of fighting AI, let’s embrace it. One of the ways we can do that is if we can have it write test cases for us, execute it, then tell us if it passed or not.

We can then easily move those generated tests to a framework like cypress or to a continuous integration environment like GitHub Actions.

So for the rest of the article, we’ll show you how you can have ai make a test case that:

  1. Generates and sends an email.
  2. Reads the contents of said email from the user’s inbox.
  3. Ensures that contents of 1 and 2 are the same.

To be safe and not risk sending any emails out to customers, we’ll use Mailsac and its API.

Making the Assistant

So for this walkthough we’re going to be using OpenAI’s “Assistant” feature. Assistants are a little bit more of a halfway point between the chat AI we all know, and an AI agent that is more autonomous.
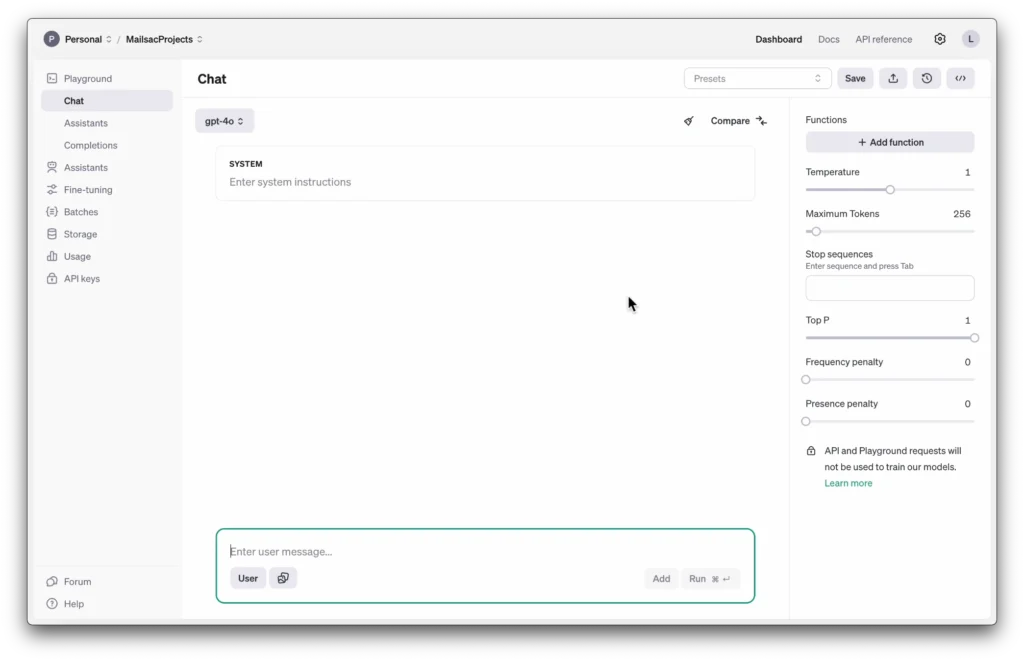
We want to give this AI the ability to generate and run some code and read files, but not necessarily make any autonomous decisions.

For the instructions we’ll give it some system prompts to let it know under what context it should be operating under.
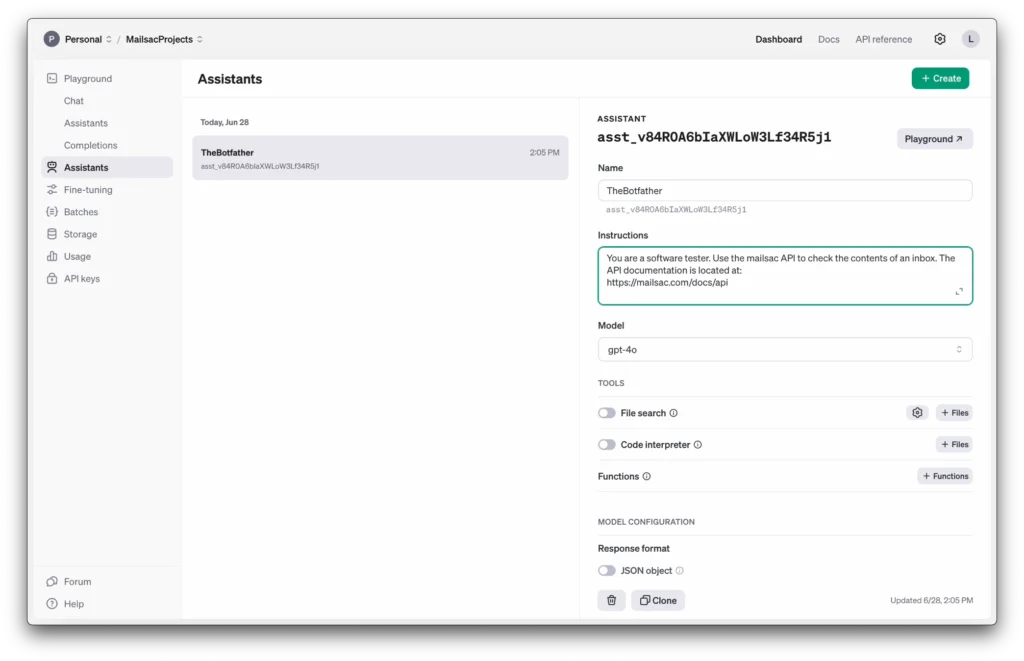
We’ll use the latest gpt-4o model and enable the code interpreter tools. That should allow it to read, run and execute some code for us.

Now let’s go ahead and start generating our test cases.

We’ll use the prompt

You are creating a code test that will return true of false if a certain criteria passes. The language for > all tests should be in javascript. Use dotenv for your API keys.

The criteria is:

  1. Generate an email message and send it via nodemailer using google’s SMTP servers. Send it to ferrari@mailsac.com.
  2. Wait 2 seconds for the email to send from Google then use the mailsac API to check the subject and
    content of the email.
  3. Make the test pass if it matches what was sent in 1 and fail if it doesn’t match.

Keep in mind that you can easily tweak the SMTP to use your own service. We’ll stick with Google’s as its the most accessible for this walkthrough.

Generating the Test Case

Fire it off to the AI Assistant and let it generate the test case. In this run it generated a mocha test for me. In previous iterations it didn’t generate a whole mocha test so I’ll ask it to just use node.
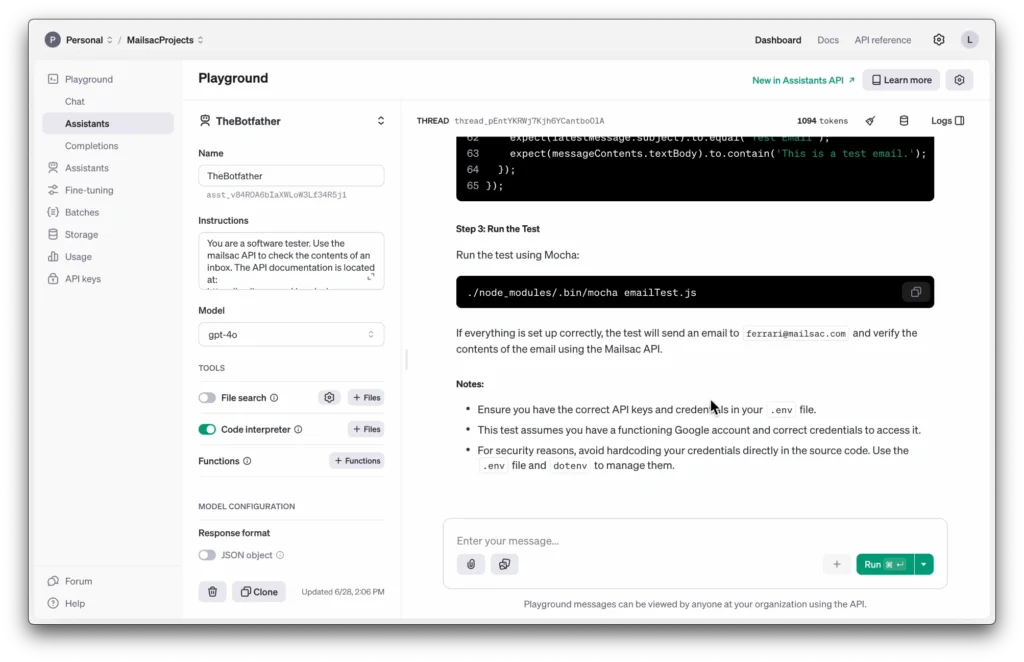
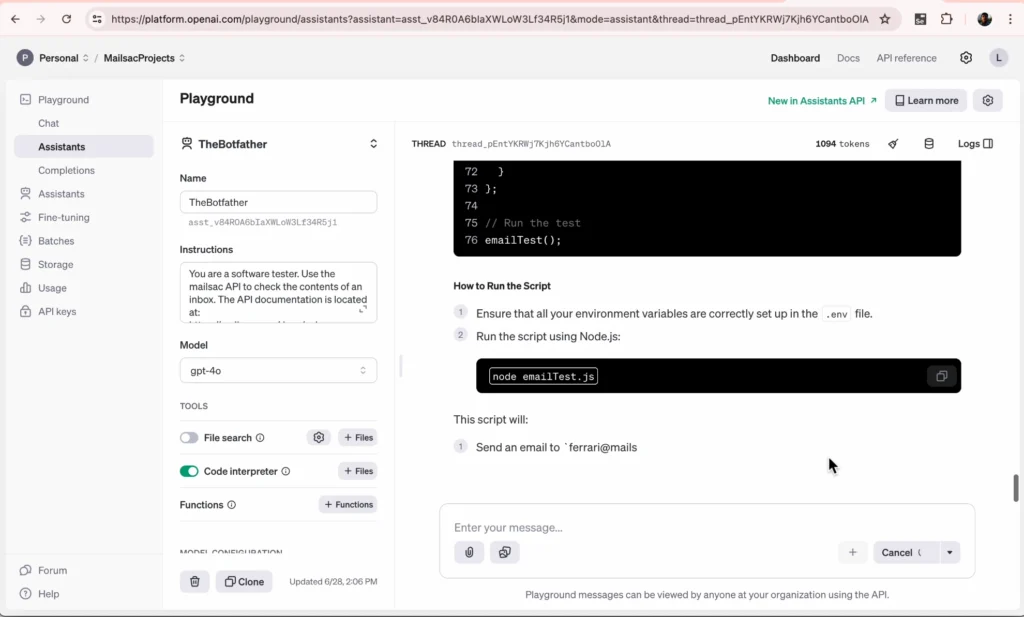
As you can see it pretty much walks you through the whole project creation process. Let’s go ahead and do our setup and install.

mkdir email_test
cd email_test
npm init -y
npm install nodemailer dotenv axios

The libraries it wants to use are pretty standard. (You could make an argument against axios but hey, let’s roll with it).

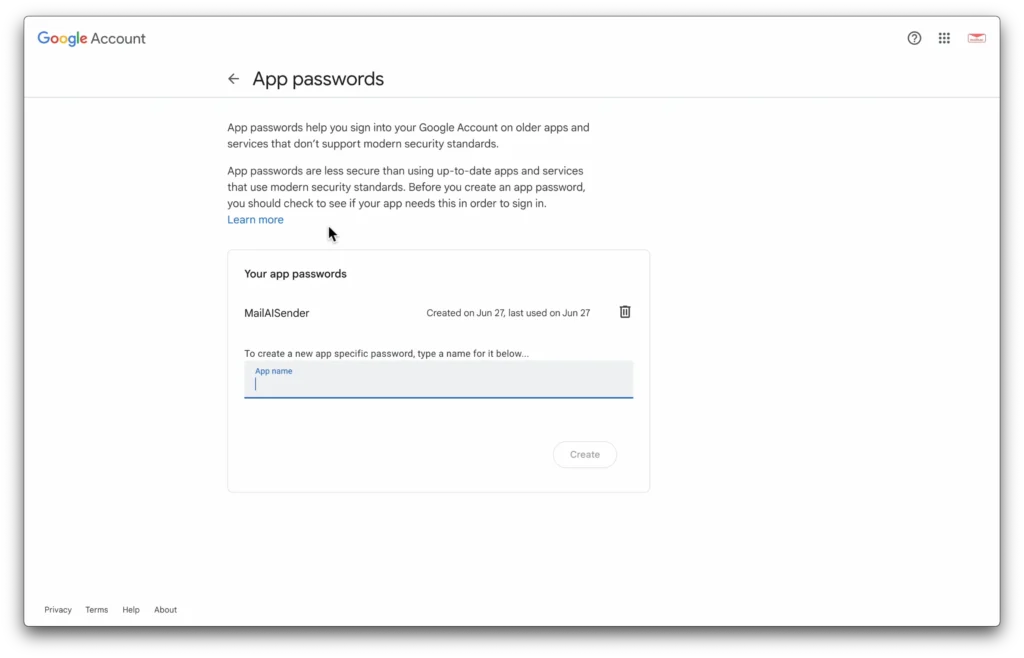
And now we’ll use a .env file to hold our API keys. You’ll need an application password for the google SMTP.

You can find where to add that in your Google account.
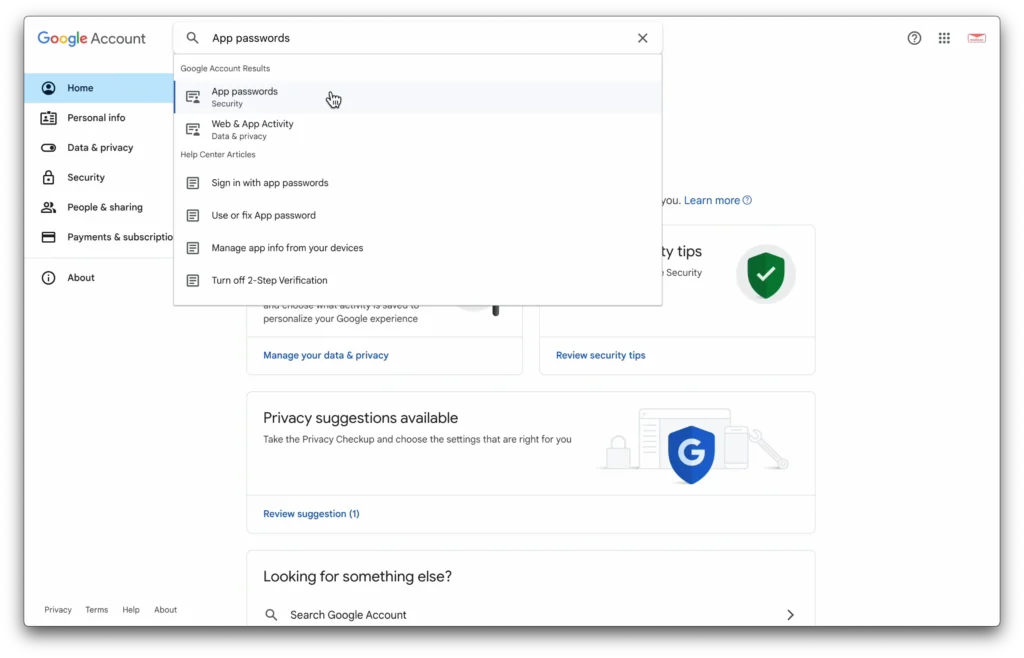
You’ll also need a mailsac key.
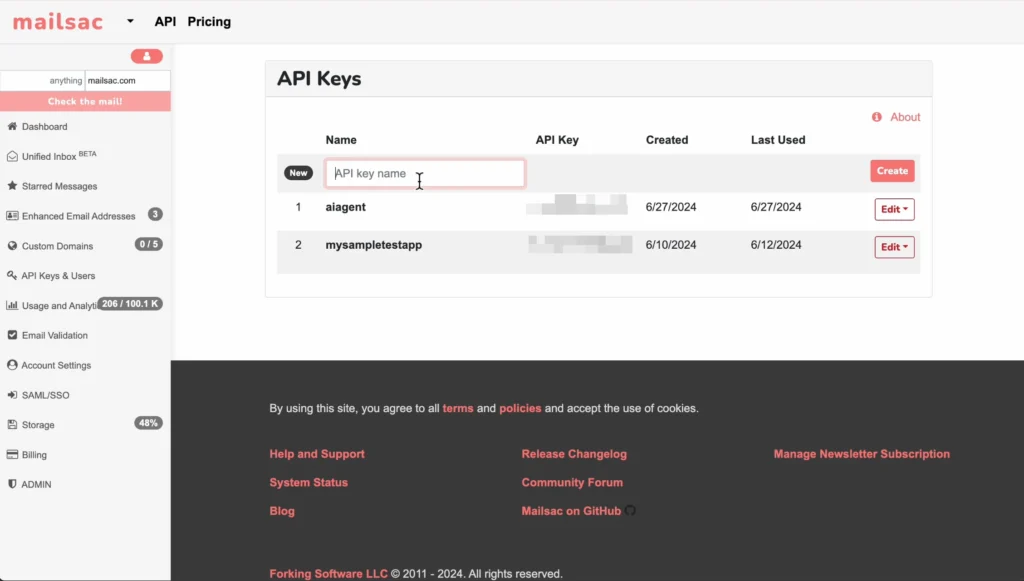
The .env file is now:

MAILSAC_API_KEY=your_mailsac_api_key
GOOGLE_EMAIL=your_google_email
GOOGLE_PASSWORD=your_google_email_password

Now copy all of your keys and email onto the .env file.

Let’s start working through the code itself

Code

Looking through the code it looks fine, with 2 exceptions: It needs to be guided on the API endpoint (to use /api/text instead of /api/messages) and it the object retrived is the text itself, so we can remove the nonexistant child textBody

Now let’s go ahead and run the test.

Check on mailsac to visually make sure an email was sent.
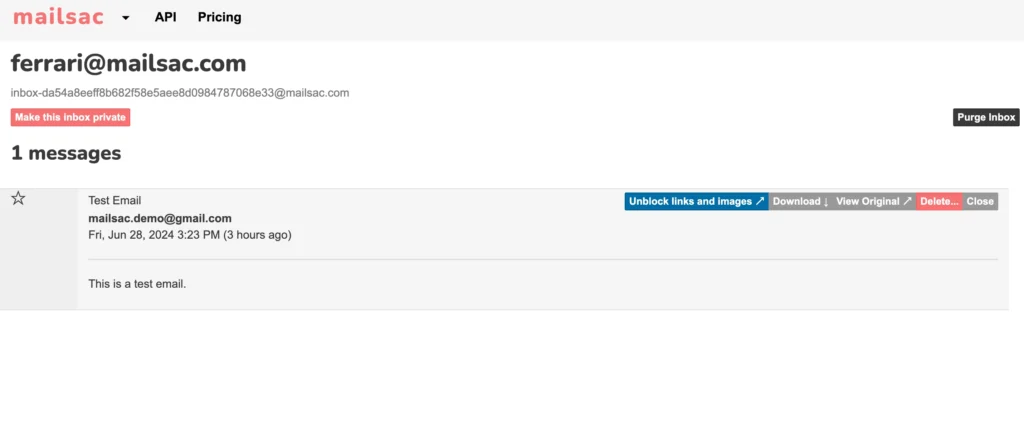
You can even make the test fail on purpose to ensure it’s working as intended.

It works!

Extending AI

From here it’s easy to incorporate these kinds of tests into specific continuous integration frameworks of your choice.

You could use cypress and work with existing libraries or an existing framework to run your tests.

Or you could use GitHub actions to fully run your now AI generated tests in the cloud. We have a guide showing you how to do just that.

Conclusion

As you can see it still took a human element to know what to want to test, frame it, and even tweak the AI’s output a bit to make sure that what it was generating made sense.

Tester’s aren’t going anywhere anytime soon, especially if you leverage AI to do the work for you while you focus on whats important to test and why.

Blog Cover

Guide To Stress Free Email Testing with Next.js

Developing an application that sends emails is straightforward but not without its risks. Ensuring deliverability but not actually having any of those emails land inside real inboxes is a top concern for any developer. Which leads to questions like: “How do you test your application’s outbound email capabilities?” or “How do I manage email testing for free?”

Enter email capture services. While the term “email capture service” tends to focus on the marketing aspects (capturing information from your calls to action, ensuring emails don’t get caught in spam, etc) they also include SMTP deliverability. Mailsac offers an email capture service that addresses the deliverability aspect, specifically not delivering any email to its intended recipient. Effectively a “black hole” where no email should escape to the outside world.

In this post, we’ll walk through a sample application in Next.js that will generate emails and have those emails captured by Mailsac’s email sandboxing service.

Do I Really Need To Do Email Testing?

Some frameworks do come with email previewing capabilities like Rails’ ActionMailer. Said frameworks don’t actually attempt to send anything but instead preview the email on your machine. We recommend real testing during the development and quality assurance phase by using an external SMTP server to mimic the application’s behavior in production.

Testing that capability has to be done safely unless you want to land on Twitter’s trending page for accidentally sending customers an integration test email.

Test Email Sending With A Next.js Application

For the rest of this guide, we’ll focus on wiring up a simple application that will allow users to send an email when a button is pushed from a UI. We’ll then demonstrate the capture of those emails in our development environment.

The components we’ll use are:

Application Creation

While the focus of this guide isn’t a line-by-line walkthrough of the sample code, we’ll focus on the key aspects of the application that mainly involve emailing capabilities.

The application source can be found in our git repository.

1. Application setup

Let’s start by creating a quick next app with tailwind support:

mailsac % npx create-next-app
…
Success! Created nodejs-send-email at /Users/mailsac/code/nodejs-send-email

cd nodejs-send-email
npm install -D tailwindcss postcss autoprefixer @tailwindcss/forms
npm install @headlessui/react@latest @heroicons/react
npx tailwindcss init -p

The above is the recommended way to install tailwind on Next.js according to their guide.

Configure tailwind.config.js by adding the highlighted lines:

module.exports = {
  content: [
	"./pages/**/*.{js,ts,jsx,tsx}",
	"./components/**/*.{js,ts,jsx,tsx}",
  ],
  theme: {
	extend: {},
  },
  plugins: [
    require('@tailwindcss/forms'),
  ],
}

and then add tailwind itself to the global CSS file inside styles/global.css and comment out some default CSS created by npx:

/* @media (prefers-color-scheme: dark) {
  html {
    color-scheme: dark;
  }
  body {
    color: white;
    background: black;
  }
}
*/

@tailwind base;
@tailwind components;
@tailwind utilities;

Tailwind is strictly optional but recommended for easy styling of the frontend.

2. Add the front page UI

Feel free to add your custom frontend code or use the index.js and components/notifications.js react component samples inside our repo.

index.js

import { useEffect, useState } from "react";
import Notification from "../components/notifications";

export default function Index() {
  const [sentEmail, setSentEmail] = useState(false);
  const [emailTo, setEmailTo] = useState("");
  const [emailBody,setEmailBody] = useState("");
  const [resultMessage, setResultMessage] = useState("");

  const sendEmail = () => {
    setSentEmail(true);
  }

  useEffect( () => {
    fetch('/api/send-email',{
      method: 'POST',
      body: JSON.stringify({ to: emailTo, body: emailBody})
    })
    .then( res => res.json())
    .then(response => {
      setResultMessage(response.message)
    })
    .catch(error => console.log(error));    

  },[sentEmail]);

  const SentEmailBanner = sentEmail === true? <Notification message={resultMessage} /> : null;

The second line brings in a component that takes in a message and formats it as a pop-up notification. The useEffect() method sends your email recipient and body input to the backend, which will forward that data to Mailsac’s servers.

3. Sign up for Mailsac’s Email Capture

Mailsac has a free email capture service. All you need is to sign up for an account and generate a key:

Mailsac dashboard
Mailsac Dashboard

4. Add a backend mail handler route

Once you’ve generated and saved your keys, you can place them in a .env file:

.env

MAILSAC_USERNAME=lcanal
MAILSAC_API_KEY=Key generated from above

Following our email capture documentation, we’ll create a backend API route for Next to handle the request:

pages/api/send-email.js

const nodemailer = require("nodemailer");

export default async function handler(req, res) {
  let emailEnvelope = JSON.parse(req.body)
  if (
        req.method === 'POST' 
        && typeof(emailEnvelope.to) !== 'undefined' 
        && emailEnvelope.to !== ''
  ){
    const mailsaUserName = process.env.MAILSAC_USERNAME
    const mailsacAPIKey  = process.env.MAILSAC_API_KEY
  
    const transporter = nodemailer.createTransport({
      host: 'capture.mailsac.com',
      port: 5587,
      // will use TLS by upgrading later in the connection with STARTTLS
      secure: false,
      auth: {
        user: mailsaUserName,
        pass: mailsacAPIKey
      }
    })
  
    try {
      const results = await transporter.sendMail({
        from: '"Sample App" no-reply@example.com',
        to: emailEnvelope.to,
        subject: 'Sample App Send',
        text: emailEnvelope.body
      })
      res.status(200).json(
        { 
          message: "You should now see an email in Mailsac's capture service", 
          response: results.data 
        }
      )
    } catch (error){
      console.log(`ERROR ${error}`)
      res.status(500).json({ message: `${error.response}`, response: error })
    }
  } else {
    return res.status(200).json({message: "No data"});
  }
}

In the highlighted line, we’re ensuring the useEffect() hook gets called with input data before we allow the rest of the function to continue. useEffect() gets called a variety of times in the component lifecycle, and this check is to ensure it was initiated by an end user and not as part of the component mounting.

5. Test driving the app

Fire up the application via

npm run dev

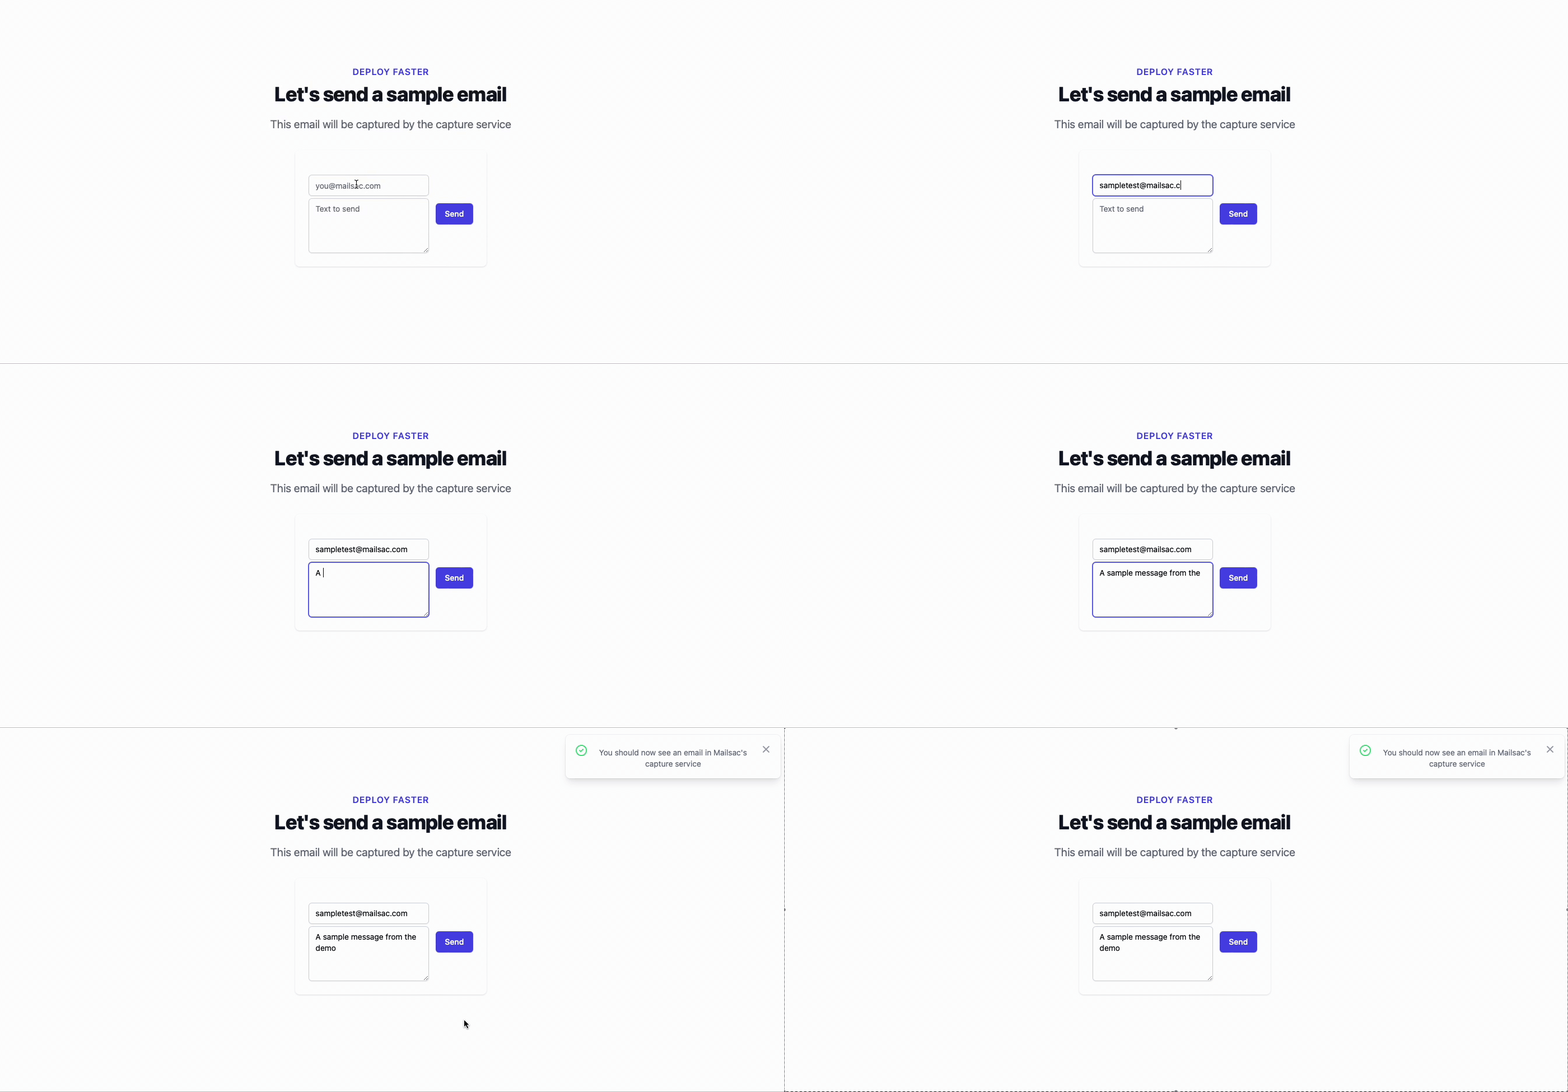
Navigate to http://localhost:3000 and type a text message:

Walking through our sample application form.

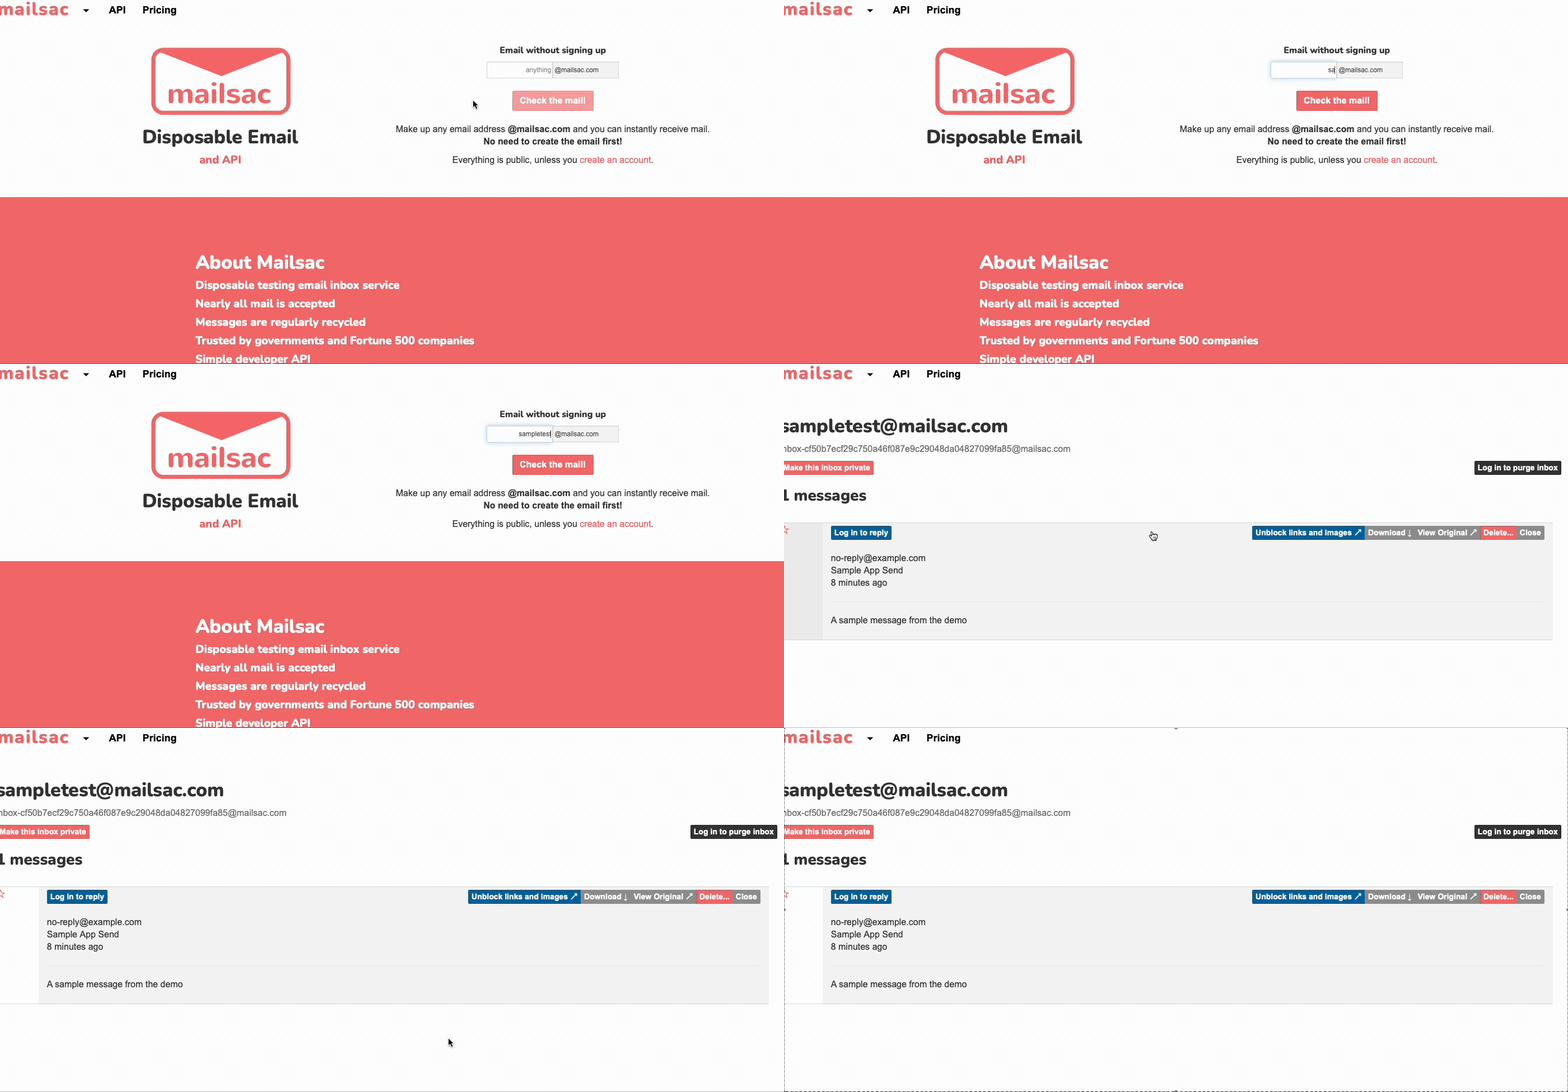
Then navigate over to mailsac.com to view the message

Checking the inbox at mailsac.com

6. Capturing other email domains

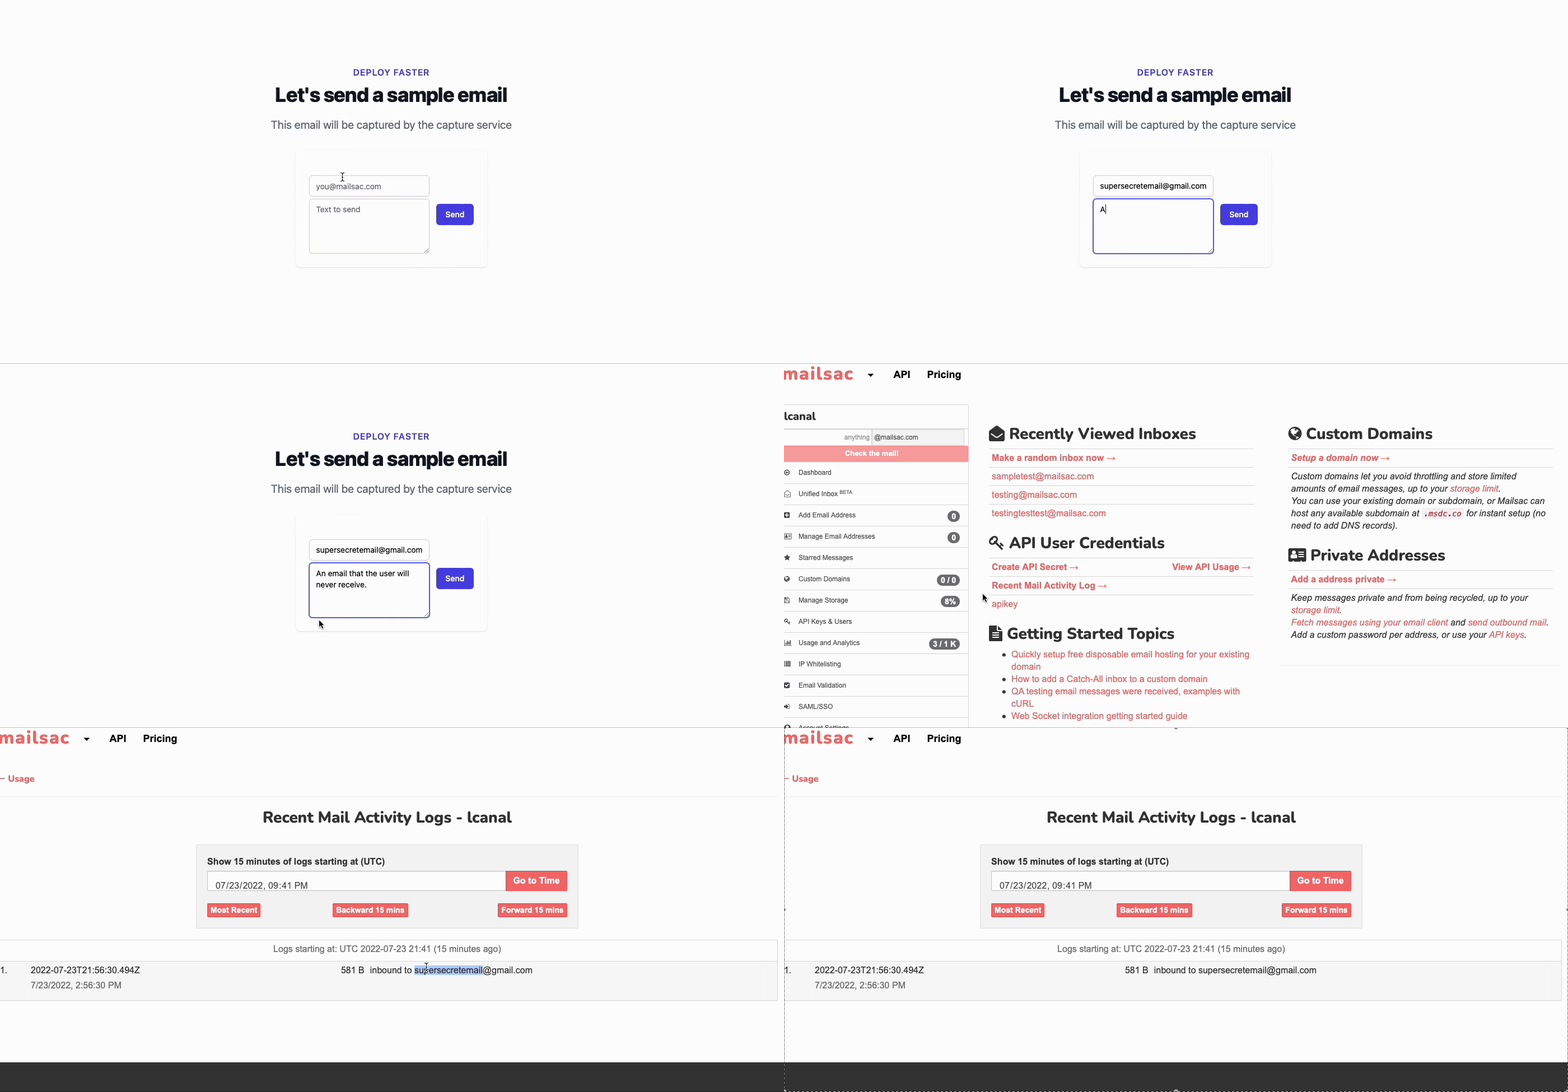
While that works well as a contrived example, the real value comes when using any arbitrary email in the recipient field:

Full application walkthrough demo, with a free check at mailsac.

Capturing emails outside the mailsac.com domain is extremely valuable when switching between different environments. For example, in the demo application example above, the .env environment file could instead look like

MAILSAC_USERNAME=$MAILSAC_NAME
MAILSAC_API_KEY=$MAILSAC_KEY
MAILSAC_HOST=capture.mailsac.com
MAILSAC_PORT=5587

With the updated send-email.js

const nodemailer = require("nodemailer");

export default async function handler(req, res) {
  let emailEnvelope = JSON.parse(req.body)
  if (
        req.method === 'POST' 
        && typeof(emailEnvelope.to) !== 'undefined' 
        && emailEnvelope.to !== ''
  ){
    const mailsaUserName = process.env.MAILSAC_USERNAME
    const mailsacAPIKey  = process.env.MAILSAC_API_KEY
  
    const transporter = nodemailer.createTransport({
      host: process.env.MAILSAC_HOST,
      port: process.env.MAILSAC_PORT,
      // will use TLS by upgrading later in the connection with STARTTLS
      secure: false,
      auth: {
        user: mailsaUserName,
        pass: mailsacAPIKey
      }
    })
  
    try {
      const results = await transporter.sendMail({
        from: '"Sample App" no-reply@example.com',
        to: emailEnvelope.to,
        subject: 'Sample App Send',
        text: emailEnvelope.body
      })
      res.status(200).json(
        { 
          message: "You should now see an email in Mailsac's capture service", 
          response: results.data 
        }
      )
    } catch (error){
      res.status(500).json({ message: `${error.response}`, response: error })
    }
  } else {
    return res.status(200).json({message: "No data"});
  }
}

The above edits would allow you to deploy to a testing or production environment and the only changes required would be in the .env file. Specifically, the SMTP host and authentication settings.

Conclusion

The above guide just scratches the surface of what you can do with our email services. We provide a unified inbox that allows testers to view their bulk email testing in one unified view and custom domains for those who do not have their own domains with zero setup configurations.

Additionally, we have a guide on using both custom domains and a unified inbox in your system testing. Check it out and tell us what you think on our forums!

Spring Cleaning with Mailsac API

My garden has been planted and the days are getting warmer. Next task, cleaning up. Mailsac won’t help you organize you garage or avoid the accumulation of clutter. But it can help you get rid of old emails.

The Delete All Messages in a Domain Endpoint released on March 23, 2021 can help you keep your private domain storage under the storage limit. It’s useful for deleting all messages before running integration tests.

This post will detail the different methods of bulk message deletion.

Cleanup a Custom Domain

All messages in a custom domain can irrevocably be deleted.

From the Dashboard select Custom Domains Select Domain to Mange → Advanced tab → Irreversibly Delete Email

The REST API has a commensurate endpoint for deleting all messages in a domain. It can be invoked by calling an HTTP POST https://mailsac.com/api/domains/{domain}/delete-all-domain-mail , where {domain} is the custom domain.

Cleanup a Private Inbox

All messages in a Private Inbox can be deleted from the website or the REST API. Both methods will not delete starred messages.

From the From the Dashboard select Manage Email Addresses Select Email Address Purge Inbox

Messages in a Private Inbox can be deleted using the endpoint for deleting messages in a private inbox. The endpoint can be used with the HTTP DELETE method on https://mailsac.com/api/addresses/{email}/messages where {email} is the private email address.

Deleting Individual Messages

Individual messages can be deleted from both private and non-private inboxes.

From the From the Dashboard enter an inbox in the inbox viewer form and select Check The Mail!. From the Inbox, Click the message → Select Delete Permanently Delete

Individual messages can be deleted using the delete message REST API. The endpoint can be called using an HTTP DELETE with the URL https://mailsac.com/api/addresses/{email}/messages/{messageId} . The {email} parameter is the email address and the {messageId} is identifier for the message to be deleted. The messageId can be found by using the list messages in an inbox REST API endpoint.

Industry Standard API Documentation

Mailsac API Documentation has been converted over to use OpenAPI.

Code Examples

The new format gives developers and quality assurance testers code samples for common programming languages (curl, Node, Python, PHP, Go, etc).

Explore the API Using Swagger UI

The API can be explored without writing any code using the Swagger UI Explorer. All that is needed to get started is a free Mailsac API Key (requires sign up).

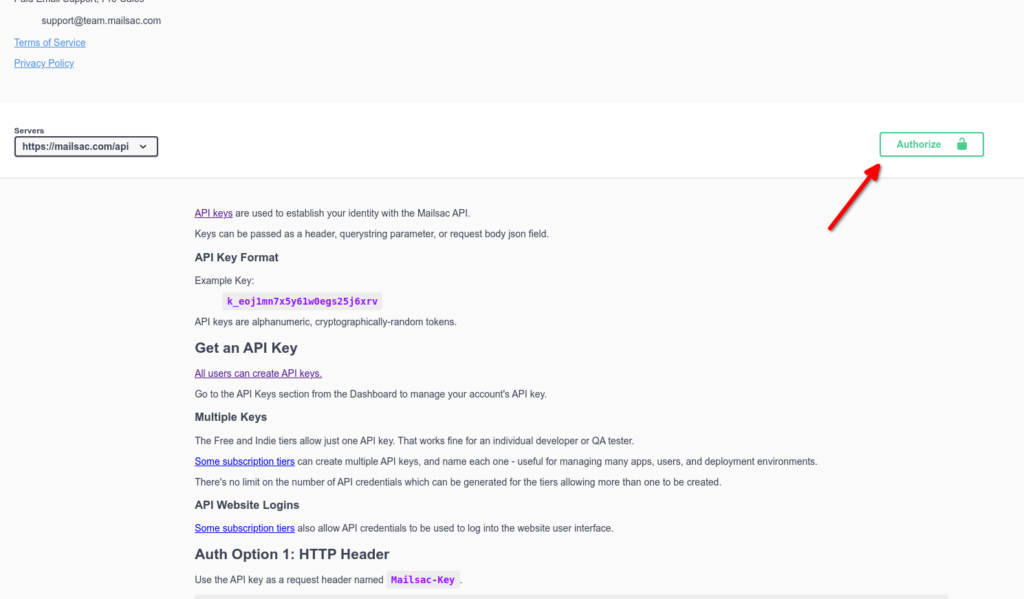
In the Swagger UI Explorer, choose the Authorize button and enter your Mailsac API Key


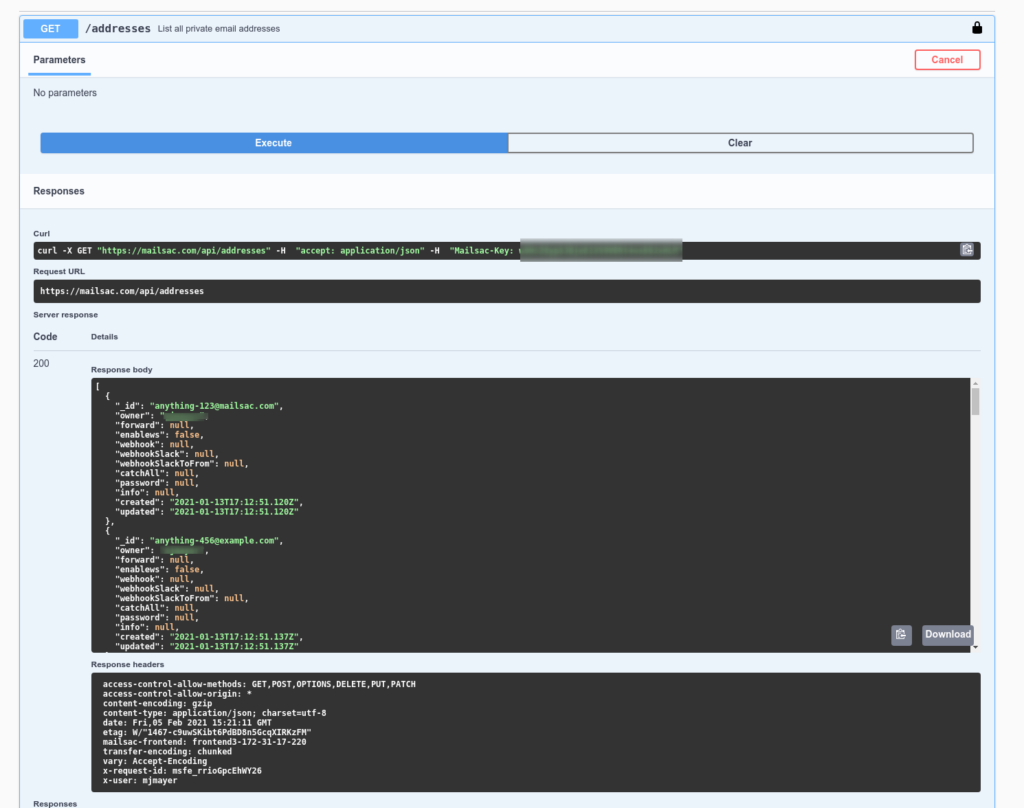
Use the “Try it out” button to interact with any of the REST API endpoints. A curl example, request URL, response body, and headers are provided.

New and Improved SMTP Header REST API Endpoint

Devs and Quality Assurance Testers Can Easily Validate Mail Headers

The SMTP header endpoint provides quality assurance testers with the option to view an email message’s SMTP headers in parsed formats that easily integrate with automated testing frameworks.

Problem

Developers and QAs are often asked to validate contents of emails. This can include from address, links, and subject. For many organizations this can be a manual process of checking the email and validating if the test criteria has been met.

Solution

Mailsac’s new message header endpoint provides SMTP headers in 3 formats:

1. JSON object format, grouped by lowercased header key. This format is easily consumed by industry standard tools such as Selenium.

{
  "received": [
    "from 107.174.234.77 by frontend1-172-31-29-224 via 172.31.42.57 with HTTP id 8m7iqeiZKJ3MzwTwUQlU for <cd@mailsac.com>; Mon Dec 24 2018 15:29:06 GMT+0000 (Coordinated Universal Time)",
    "from 107.174.234.77 by smtp-in2-172-31-42-57 via 172.31.23.10 (proxy) with SMTP id 8m7iqeiZKJ3MzwTwUQlU for <cd@mailsac.com>; Mon, 24 Dec 2018 15:29:06 UTC",
  ],
  "from": [
    "grem@hello.msdc.co"
  ],
  "to": [
    "cd@mailsac.com"
  ],
  "subject": [
    "invitation to collaborate"
],
  "date": [
    "Mon, 24 Dec 2018 15:29:06 +0000"
  ]
}

2. Ordered JSON array format. This formats pre-parses the headers, but maintains the original order, while still handling duplicate headers such as Received.

?format=ordered-json

[
  {
    "name": "received",
    "value": "from 107.174.234.77 by frontend1-172-31-29-224 via 172.31.42.57 with HTTP id 8m7iqeiZKJ3MzwTwUQlU for <cd@mailsac.com>; Mon Dec 24 2018 15:29:06 GMT+0000 (Coordinated Universal Time)"
  },
  {
    "name": "received",
    "value": "from 107.174.234.77 by smtp-in2-172-31-42-57 via 172.31.23.10 (proxy) with SMTP id 8m7iqeiZKJ3MzwTwUQlU for <cd@mailsac.com>; Mon, 24 Dec 2018 15:29:06 UTC"
  },
...
  {
    "name": "to",
    "value": "cd@mailsac.com"
  },
]

3. Plaintext original format. This format is useful when you are interested in parsing or inspecting the email headers yourself, and do not wish to download the entire message.


?format=plain

Received: from 107.174.234.77 by frontend1-172-31-29-224 via 172.31.42.57 with HTTP id 8m7iqeiZKJ3MzwTwUQlU for <cd@mailsac.com>; Mon Dec 24 2018 15:29:06 GMT+0000 (Coordinated Universal Time)
Received: from 107.174.234.77 by smtp-in2-172-31-42-57 via 172.31.23.10 (proxy) with SMTP id 8m7iqeiZKJ3MzwTwUQlU for <cd@mailsac.com>; Mon, 24 Dec 2018 15:29:06 UTC
...
To: cd@mailsac.com

“We are currently using the REST API headers endpoint in support between our own microservices. Our POP3 server fetches headers of message to implement the POP3 TOP command.” — Michael Mayer, Partner Forking Software LLC

Getting Started

The message header endpoint /api/messages/:messageId/headers is available on all Mailsac plans (including our free tier). See our API Specification for more information.

This code example could can be modified to view the headers for the first email message on an inbox calendartrinity@mailsac.com. Make sure to insert your API Key and change the email address to an email address you which is public or reserved by your account.

const superagent = require('superagent') // npm install superagent

const mailsac_api_key = 'YOUR_API_KEY_HERE' // change this!

superagent
  .get('https://mailsac.com/api/addresses/calendartrinity@mailsac.com/messages')
  .set('Mailsac-Key', mailsac_api_key)
  .then((messages) => {
      const messageId = messages.body[0]._id
      superagent
          .get('https://mailsac.com/api/addresses/calendartrinity@mailsac.com/messages/' + messageId + '/headers')
          .set('Mailsac-Key', mailsac_api_key)
           .then((response) => {
               console.log(response.body)
           })
  })
  .catch(err => console.error(err))

/**
{
  received: [
    'from [ by fireroof via ::1 with HTTP id bo4xdVji_oqEixBO0gGLbvIoe for <calendartrinity@mailsac.com>; Wed, 28 Oct 2020 23:05:29 GMT',
    'from [ fireroof with SMTP id bo4xdVji_oqEixBO0gGLbvIoe for <calendartrinity@mailsac.com>; Wed, 28 Oct 2020 16:05:29 PDT'
  ],
  'x-mailsac-inbound-version': [ '' ],
  date: [ 'Wed, 28 Oct 2020 16:05:29 -0700' ],
  to: [ 'calendartrinity@mailsac.com' ],
  from: [ 'bclinton@mailsac.com' ],
  subject: [ 'test Wed, 28 Oct 2020 16:05:29 -0700' ],
  'message-id': [ '<20201028160528.2893005@fireroof>' ],
  'x-mailer': [ 'swaks v20190914.0 jetmore.org/john/code/swaks/' ]
}
**/

Retiring TLS 1.0 and TLS 1.1

Our REST APIs and website will require the use of TLSv1.2 on October 24, 2020. TLS 1.2 was published as RFC 5246 in 2008.

All major web browsers (Chrome, Edge, Internet Explorer, Firefox, and Safari) have already disabled TLS 1.0 and TLS 1.1. Most modern programming languages have support for TLS 1.2.

Integrations written in Java 6 and Python 2.6 do not have TLS 1.2 support.

References

REST Compliant Response From Email Validation API

The GET Method on the REST API endpoint /api/validations/addresses/:addressToValidate has been updated to return a JSON object. Previously, this endpoint was returning an array. The POST Method response remains unchanged.

An example GET request and response has been added to the Mailsac REST API documentation.

Email validation via the Mailsac Website is still available to all registered customers. An email address can be checked for valid format and if it is associated with any known disposable email services.

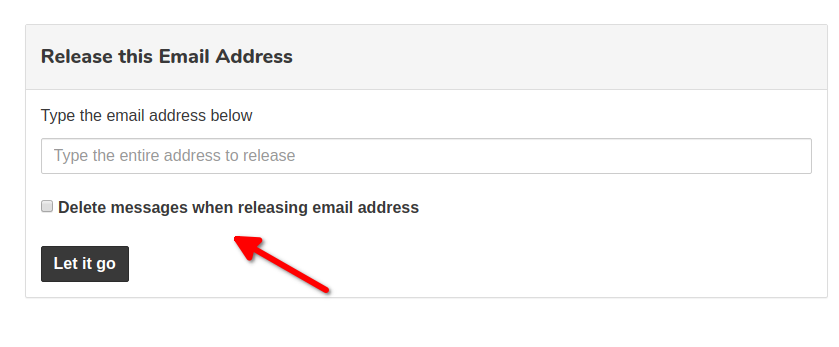
New Delete Messages Flag When Releasing a Private Email Address

When releasing a private address, there is now an option to “empty the inbox” – deleting all messages associated with the private address. You can find the option by clicking the settings button when managing your private addresses.

The API endpoint DELETE /api/addresses/:email now supports the query string deleteAddressMessages. When deleteAddressMessages=true is passed, all messages associated with the inbox will be deleted.

Please note that all messages are deleted, including starred/saved messages. It is immediate and irreversible.

Authentication Changes

Mailsac now requires authentication on all API routes and many parts of the website. The API key for your account can be created and viewed from the dashboard. If you are using the website to view emails you will need to create an account and sign in to view the body, images, and headers.

API Authentication

Many API routes required authentication prior to this change. If you are a customer with an existing API key and using it to make your API requests, there are no changes you need to make.

If you were using anonymous access, you will need to create an account and create an API key.

There are three methods for authenticating to the API. HTTP Header, Query String Parameter, and Request JSON Body. To use the HTTP Header create the request header Mailsac-Key and use the value of your API key. To use the query string parameter append the query string parameter _mailsacKey to the query section (after ?) in the url. Example: https://mailsac.com/api/addresses/test@example.com/messages?_mailsacKey=eoj1mn7x5y61w0egs25j6xrv
During a POST or PUT operation a JSON field _mailsacKey can be used.

For a complete list of API Routes check out the API documentation.

Website Authentication

The content of the most recent email received is still available without logging in. Older messages, images, and headers will require an account. You can register for an account for free.